JELLY CUSTARD PUDDING

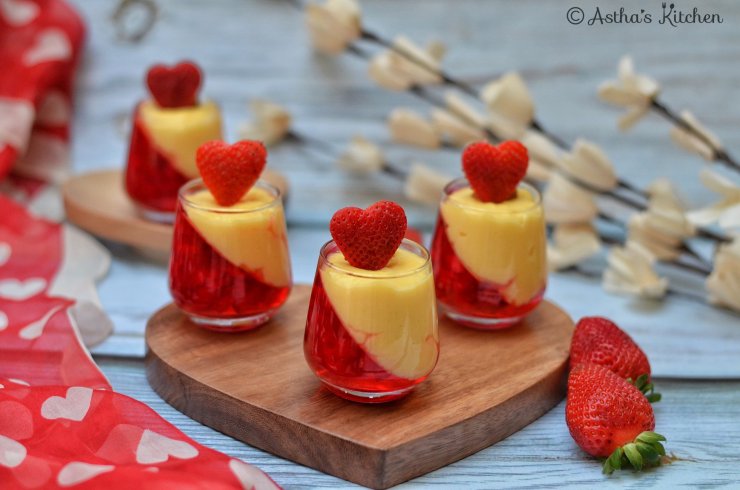
This fruit custard with jelly | layered jelly and custard is a delicious dessert, that is so easy to whip up and requires no fancy ingredients! This jelly custard recipe is a simple, eggless, fuss-free preparation, and one elegant looking dessert. If you are in no mood to make a lavish and time-consuming sweet treat for your guests, Try this!! It will not let you down!

INGREDIENTS:

  • 2 cups whole milk
  • 3 tbsp custard powder, vanilla flavor, or any other flavor of your choice
  • 3 tbsp sugar or as per desired sweetness
  • 1 Jelly dessert packet
  • 1.5 cups of chopped  strawberries ( You may use assorted fruits,  berries, grapes & kiwis)

INSTRUCTION:

  1. Prepare Jelly as per package instructions. Keep it aside to set.
  2. Once it is lukewarm, pour about 1/4 cup in serving glasses or bowl. Add some strawberries .
  3. Keep the glasses slantingly in a muffin tray or use any bowl.
  4. I kept in a rice full plate for the cross jelly look. It’s totally optional.Leave it to set completely in the refrigerator.
  5. To prepare the custard: Dissolve the custard powder in about 1/4 cup of milk (room temperature/cold), mix well to form a smooth paste. Set aside. Boil in the remaining milk along with the sugar in a saucepan.
  6. Add the prepared custard paste in the boiling milk and heat further for 2-3 minutes, stirring continuously.
  7. To avoid the skin on top of the custard, place a parchment paper/ cling wrap on the surface of the custard before it sets. Refrigerate it until further use.
  8. To assemble: pour about 3 tablespoons of the custard over the set jelly, top with some strawberries.

I hope you enjoyed this simple vanilla custard with jelly, presented in a fancy way!
I would love to hear from you if you try it out! Please feel free to share your feedback with photos and suggestions to me at Tina.astha@gmail.com

Thank you for visiting Astha’s Kitchen. I would love to hear your feedback. 
 
Hate to miss a recipe? Follow my Facebook or Instagram page to stay updated!

 Astha’s Kitchen on Facebook 

Like, share and spread your love ❤️


HOMEMADE TUTTI FRUTTI / SWEET COLOURFUL CANDY WITH WATERMELON RIND

Tutti Fruity is used in making cakes, bread, sweets, desserts. Today we are making colourful Tutti Fruity with leftover Watermelon Rind. This is a very simple and useful recipe.
wp-15886925361158010993025697739116.jpg

INGREDIENTS:

Watermelon rind finely chopped 2 cup
1/2 cup sugar
Food colours Red, yellow, blue

INSTRUCTIONS :

  1. Remove the green and red part of the watermelon rind. Cut in small pieces the watermelon rind with a knife.
  2. Boil water and add watermelon rind pieces in boiling water and boil for 5 minutes on high flame.wp-15886921175964088813415063860207.jpg
  3. Sieve the boiled rind pieces.
  4. Add 1/2 cup of water and 1/2 cup of sugar in a saucepan. Melt sugar and add boiled watermelon rind pieces. Boil for 4,5 minutes on high flame. Switch of the flame.wp-15886921174043821883874553782503.jpg
  5. Divide the sugar boiled watermelon among three bowls with sugar syrup. Mix red, blue, yellow food colour respectively.
  6. Keep aside for 2,3 hours. After 3 hours, sieve and spread on a sieve or a cotton cloth. Sundry for a day.wp-15886921171882174085822178986715.jpg
  7. Wow! Colourful homemade Tutti Frutti is ready now. Store in a box and keep in the fridge .

    NOTES :

  • Do not throw this leftover sugar syrup, use in making summer drinks or desserts.
Thank you for visiting Astha’s Kitchen. I would love to hear your feedback. 
Hate to miss a recipe? Follow my Facebook or Instagram page to stay updated!

 Astha’s Kitchen on Facebook 

                                                Like, share and spread your love ❤️

WATERMELON CANAPES

Looking for a fresh start for parties. Juicy Watermelon slices with black salt, cumin and pepper with the chillness of yoghurt are perfect to kick start any event.
This combo worked so well that the dish became an absolute favourite for both kids and adults.
Do try out this summer treat and let me know.
picsart_05-02-081283107402872202001.jpg
INGREDIENTS:
Watermelon slices 10
Black salt 2 pinch
Thick Curd/yoghurt 1/8 cup
Pepper ground 1 pinch
Cumin ground 1 pinch
Cilantro/mint for garnish
INSTRUCTIONS:
  1. Take yoghurt/curd in a bowl and add freshly ground pepper and cumin…
  2. Take little black salt in a small bowl…
  3. Sprinkle/rub little black salt on watermelon slices(cut in your desired shapes, I cut it as Heart shape using a cookie cutter)…
  4. Place a spoon of yoghurt in top carefully in the centre…Garnish with little cilantro or mint to add to the freshness…
picsart_05-02-084230185732506846445.jpg
Thank you for visiting Astha’s Kitchen. I would love to hear your feedback. 
Hate to miss a recipe? Follow my Facebook or Instagram page to stay updated!

 Astha’s Kitchen on Facebook 

Like, share and spread your love ❤️

THE CRISPY PULAO BALLS WITH STRAWBERRY CHUTNEY

How can leftover Pulav and veggies be used to win your kids’ hearts? It might sound like a riddle to you, but it is possible as you will see from this recipe. Cooked pulao and colourful vegetables are used to make a mildly spiced dough that is shaped into balls and deep-fried.
Broccoli, as we all know, is very healthy food. It is very low in Saturated Fat and Cholesterol. It is also a good source of Protein, Vitamin E & calcium. So we must add such healthy food to our diet.
This is a wonderful way to include veggies like broccoli into your kids’ diet, and an intelligent alternative to store-bought fries, chips and cheese balls.
The Crispy Pulao Balls are really so crunchy outside and soft inside that your kids will love it!
leftover pulao, chopped onions, capsicum, green chilli and some cheese
I really like this kind of recipes where we can create a new dish out of some leftover dish. And if the taste of a new dish is so amazing then what is left to complain
picsart_03-15-068881266907594782887.jpg
INGREDIENTS:
2 cups leftover pulao/rice
1 onion chopped
1 small capsicum chopped ( you can use green, red yellow )
1 cup broccoli grated
1 green chilli seeds removed and chopped
1 tbsp chopped coriander
2 cheese cubes grated
Salt and pepper to taste (taste before adding as pulao and cheese already have salt)
2 tbsp plain flour/ maida
water to make a thick paste
Breadcrumbs to roll balls
oil for deep frying
INSTRUCTIONS: 
  1. Mash pulao with your hands. Add chopped onions, capsicum, green chillies, coriander leaves & broccoli.img-20190310-wa00392397961389940278234.jpg
  2. Add grated cheese, salt, and pepper. you will have to taste the pulao first and add salt and pepper accordingly. Mix everything thoroughly.
  3. Make small balls by rolling the mixture in your hands.img-20190310-wa00419035280312369009000.jpg
  4. Make a thick paste of plain flour with water. Dip rice balls in the flour paste.
  5. Roll the balls in the breadcrumbs so that they are coated uniformly.img-20190310-wa00405286687122468847202.jpg
  6. All the balls are ready for frying. you can keep these in the fridge for some time and deep fry them just before serving.
  7. Tasty yummy irresistible rice balls are ready. Serve them with Strawberry spinach chutney
Strawberry Spinach Almond chutney :
Strawberry 1/2 cup
Spinach 1/2 cup
Almonds 5-6
salt as per taste
green chilli 1
8f525838-0e26-472c-8eb4-15e28add22ad
Combine all ingredients together and blend in a mixer to a smooth paste.
Serve fresh.
picsart_03-15-06945287527783148730.jpg
NOTES:
  •  Leftover pulav had potato, carrot, and peas. that is why I have not added them separately. If you are making these balls with plain rice feel free to add as many vegetables as you like. your kids will still devour these rice balls.

EASY BANANA DESSERTS:BANANA POPS


These are perfect for kids, and really anyone, who needs just a sweet and refreshing treat.These banana pops are great for the snack or as part of breakfast.

This was my first time making banana pops. It turns out, making these is super easy!
Of course, fresh fruit and vegetables are one of the best snacks, but sometimes we need to get creative to make them exciting and fun. Especially, if you have two picky eaters, like my Daughters.

1512531351437607866128.jpg

These Easy Frozen Banana Pops are the perfect little snack, after-school snack or great for adding to your meals for an extra boost! They’re super easy to make and are amazing in so many ways. It’s a super-kid-friendly recipe as well.

1512531308153160638030.jpg

PREP: 10 MINS  TOTAL TIME: 10 MINS  YIELD: MAKES 16

All you need to make these easy banana desserts are:

INGREDIENTS:

1 or 2 bananas ripe but firm
1/3 cup chocolate chips /or chocolate melted
12 lollipop sticks
Toppings: I used multicolor sprinkles and red and silver sprinkles and coconut flakes. I think chopped nuts or crushed graham crackers would be yummy, too!picsart_12-06-081672528907.jpg

INSTRUCTIONS:

  1.  Peel and slice bananas into thick slices.
  2. Melt chocolate in microwave until soft. (This took me two 45 sec shots.)
  3. Place a lollipop stick in each banana slice.
  4. Dip banana slices into melted chocolate and sprinkle with the desired topping.1512530416569
  5. Place dipped banana slices on wax paper and freeze until hardened (about 2 hours).

Enjoy!

15125313952361046650517.jpg

  • Thank you for visiting Astha’s Kitchen. I would love to hear your feedback. 

    Hate to miss a recipe? Like my Facebook to stay updated!
    Like share and spread your love ❤️


MONACO CHEESY BITES

These Monaco Cheesy Bites are basically salty biscuits, loaded with the goodness of veggies and with cheese kids would gobble these up in no time. A best after school snack too.

Cheesy Monaco Bites is a simple, easy and quick to make starter recipe that will surely impress your family and friends. Involve your kids in this fun activity; I am sure they will enjoy it too.

Kids will love this recipe, as they can bite while playing, and no need to find place to sit while eating.

My kids loved it …ये दिल मांगे मोर

Prep Time: 2 mins
Cook Time:15 mins Serve: 5

INGREDIENTS :

2 tbsp Butter
1 cup, mixed veggies (carrot, peas and corn)
3 tbsp Maida/APF
1/3 cup Milk
1 tsp Dried Oregano powder
2 tbsp Pizza sauce
1/2 tsp Paprika powder
2 tbsp Chopped almonds (roasted)
1/4 cup Grated Cheese
Chilli flakes to taste
Milk to adjust consistency
Mint /coriendee leaves to garnish
25-30 nos Monaco Biscuits
5 nos Cheese Slices quartered

INSTRUCTIONS:

  1. Heat up the butter in a pan and the mixed veggies. Cook it until soft around 2-3 mins.PicsArt_10-05-02.38.50.jpg
  2. Add the maida, stirring continuously cook until the floury taste goes around 2 mins.
    Stirring continuously add in the milk.PicsArt_10-05-02.40.36.jpg
  3. You will see that the mixture thickens quickly.
  4. Switch off the gas and add in the oregano, pizza sauce, paprika powder and almonds.
  5. Stir to mix everything.
  6. Add in the grated cheese and mix everything well.PicsArt_10-05-02.42.05.jpg
  7. Top it off with some chilli flakes to suit your family needs and also if you find that it is too thick just add in some milk to adjust the consistency such that it is eay to spoon later.
  8. Let it cool a bit and transfer to a bowl.

TO ASSEMBLE  

  1. Take a monaco biscuit. Place on quartered cheese slice on top.
  2. Spoon some prepared veggie topping on top.
  3. Garnish with mint leaves or farsan.
  4. Serve it with tomato ketchup if need be.PicsArt_10-05-03.06.03.jpg
  5. And thats it for your Monaco Cheesy Bites.


NOTES :

  • You can just add any flavours to the veggies. And even can change the veggies to your family’s preference.
  • The topping can be made ahead of time and everything can be put together right before guests arive.
  • Some other veggie combination like Boiled Potato and Paneer with Mint chutney or Onion and Capsicum with some dip and chutney can also be used.
  • Assemble the biscuits just before serving or else it would turn soggy. In fact ask your guests to help themselves so that they can decide what they like.


Thank you for visiting Astha’s Kitchen. I would love to hear your feedback. 

Hate to miss a recipe? Like my Facebook to stay updated!

Astha’s Kitchen on Facebook

Like share and spread your love ❤️