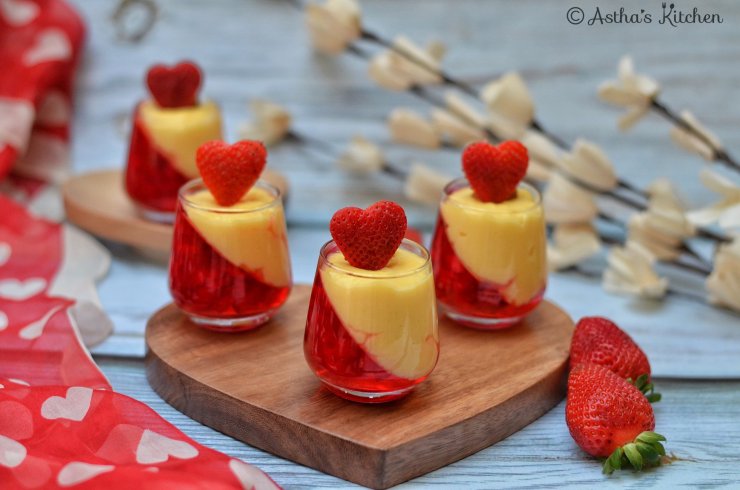
JELLY CUSTARD PUDDING

This fruit custard with jelly | layered jelly and custard is a delicious dessert, that is so easy to whip up and requires no fancy ingredients! This jelly custard recipe is a simple, eggless, fuss-free preparation, and one elegant looking dessert. If you are in no mood to make a lavish and time-consuming sweet treat for your guests, Try this!! It will not let you down!

INGREDIENTS:

  • 2 cups whole milk
  • 3 tbsp custard powder, vanilla flavor, or any other flavor of your choice
  • 3 tbsp sugar or as per desired sweetness
  • 1 Jelly dessert packet
  • 1.5 cups of chopped  strawberries ( You may use assorted fruits,  berries, grapes & kiwis)

INSTRUCTION:

  1. Prepare Jelly as per package instructions. Keep it aside to set.
  2. Once it is lukewarm, pour about 1/4 cup in serving glasses or bowl. Add some strawberries .
  3. Keep the glasses slantingly in a muffin tray or use any bowl.
  4. I kept in a rice full plate for the cross jelly look. It’s totally optional.Leave it to set completely in the refrigerator.
  5. To prepare the custard: Dissolve the custard powder in about 1/4 cup of milk (room temperature/cold), mix well to form a smooth paste. Set aside. Boil in the remaining milk along with the sugar in a saucepan.
  6. Add the prepared custard paste in the boiling milk and heat further for 2-3 minutes, stirring continuously.
  7. To avoid the skin on top of the custard, place a parchment paper/ cling wrap on the surface of the custard before it sets. Refrigerate it until further use.
  8. To assemble: pour about 3 tablespoons of the custard over the set jelly, top with some strawberries.

I hope you enjoyed this simple vanilla custard with jelly, presented in a fancy way!
I would love to hear from you if you try it out! Please feel free to share your feedback with photos and suggestions to me at Tina.astha@gmail.com

Thank you for visiting Astha’s Kitchen. I would love to hear your feedback. 
 
Hate to miss a recipe? Follow my Facebook or Instagram page to stay updated!

 Astha’s Kitchen on Facebook 

Like, share and spread your love ❤️


FRUITY CUSTARD TRIFLE


I totally adore Layered desserts. With different layers of cake, fruits and cream, they look so vibrant and beautiful.

Coming back to this trifle, it’s creamy, fruity, perfectly sweet and really indulgent!  It’s so easy and delicious that you must try it! I make custard Whenever I have Milk left over.
picsart_03-11-067256540965519196230.jpg

If you ask me, the only effort really required in this trifle is to make vanilla custard which also is very simple to make. Once the custard is done and cooled down, this delicious and satisfying trifle comes together very quickly.

This trifle is perfect when you don’t have too much time on hand and want to make something which your guests will love.
picsart_03-11-061679342554013794451.jpg

This Fruity custard trifle is  made up of the following layers 

Buttery biscuit crust
Vanilla thick custard
Mix fruits (Strawberries /grapes / pomegranate /orange)

picsart_03-11-0627102345568246883.jpg

INGREDIENTS :

Digestive biscuit layer-
1/2 cup crushed digestive biscuits( I used oreo and Britania marry gold )
4 Tsp melted butter and
1 Tsp chocolate sauce
1 cup thick custard
1 cut mix fruits chopped
picsart_03-11-068663654330445555056.jpg


INSTRUCTIONS:

  1. Combine the biscuit layer ingredients together and set aside.
  2. Custard Layer-
    Make according to package instructions, add little more custard powder to make a thick custard. Chill it in the fridge.
  3. Assembling the dessert
  4. Take a glass bowl and add buttery-biscuit crumbs as the first layer. Press down and level it.picsart_03-11-064612244637703809367.jpg
  5. For the second  layer, add thick custard.
  6. For the last layer, add chopped fruits.
  7. Chill in the fridge for an hour and garnish with mint and chocolate sauce before serving.

NOTES:

  • You may use any fruits of your choice.
  • You may use nuts too.

Disclaimer: I may receive a small commission from the following purchase links. The proceeds help in supporting Astha’s Kitchen so that I can continue creating delicious recipes for you 🙂

Custard Powder


Thank you for visiting Astha’s Kitchen. I would love to hear your feedback. 

Hate to miss a recipe? Like my Facebook to stay updated!
Like share and spread your love 


KHEER MOTICHOOR TRICOLOUR DESSERT

Shot glass dessert making is super fun, in fact, it has become my signature dish.
Today’s shot glass dessert recipe is a fusion of sweet dishes to honour the Indian flag. This Tiranga Dessert contains 3 layers of different colours of the Indian flag. It is a mix of Thick kheer (Rice pudding ) and Motichur laddu.
Wishing you all a very Happy 70th Republic Day.🇮🇳🇮🇳🇮🇳🇮🇳
Perfect dessert for your parties or for your family.
PicsArt_01-25-04.20.31.jpg

INGREDIENTS:
Basmati Rice (1/2cup or एक मुट्ठी)
Milk (1 ltr)
Sugar ( 1/2) or as required
Crushed Cardamom (1/2 tsp)
15-20 almonds/ badam, blanched and sliced
Pistachios, Cashew and Raisins (3 tbsp)
2tbsp cornflour
Motichoor ladoo 250 gms

For green kheer…
4-5 paan leaves
1tbsp gulkand

INSTRUCTIONS:

  1. Wash and soak the rice for 1-2 hours.
  2. Add milk in a heavy bottom pan and bring it to boil.
  3. When the milk starts to boil, add the rice slowly to it. Remember to keep stirring the milk continuously.194.jpg
  4. Take 1/2 a cup milk more and add 1tbsp cornflour to it.
  5. Add this 1/2 cup to the stirred milk.
  6. Allow it to boil in low to medium flame till the rice gets cooked well but it should be firm and soft without losing its shape.
  7. Generally, rice takes a longer time to cook. So keep mixing every now and then and make sure it is not burnt in the bottom.
  8. After about 20 to 25 minutes, when the milk has thickened and the rice grains have become soft add sugar, cashew nuts, almonds, pistachios and raisins and cook for another 5 minutes.
  9. Lastly, add crushed cardamom.
  10. Remove from heat and garnish with almonds.Assembling…
  11. Take kheer in 2 separate bowls.
  12. In one bowl add crushed paan leaves and gulkand and mix well. This becomes our green layer.PicsArt_01-26-10.49.22.jpg
  13. Crush all the motichur laddoos .
  14. Take shot glasses put 2 tsp of green kheer and lightly tap the glass to set it.
  15. Next, add 2 tsp of white kheer and tap it.PicsArt_01-26-10.47.28.jpg
  16. Top it with crushed motichur laddoos and some pistachios.
    tadddddaa your Tricolour Kheer motichur dessert is ready.PicsArt_01-26-07.03.26.jpg

    NOTES:

    Always add the sugar in the end.
    This kheer would thicken as it cools down.
    Keep stirring the kheer in between to prevent it from burning and sticking to the bottom of the pan.


Thank you for visiting Astha’s Kitchen. I would love to hear your feedback. 

Hate to miss a recipe? Like my Facebook to stay updated!

Astha’s Kitchen on Facebook

                                                Like share and spread your love ❤️

NO BAKE EGGLESS MANGO CHEESECAKE SHOTS

अभी न जाओ छोड़कर की दिल अभी भरा नही …………..
Before mango seasons end try some mango cheesecake shots. Creamy no bake mango cheesecake trifles, freshly whipped cream and topped with fresh mangoes, what’s not to love? The perfect no-bake summer dessert.

1529336153595

This mango cheesecake has a nice dominant flavor of mangoes. For making this eggless mango cheesecake, I have not used cream cheese. I have used paneer instead. I have made homemade paneer for this recipe.

The concept is simple: graham cracker crust, no-bake cheesecake filling, and a topping.
Really This is the best recipe when you don’t want to use cream cheese. Paneer does its job perfectly.

Shot glass dessert is my favorite…You can call it my signature dish.
Every time I make new shot glass dessert for any family get together or party.

This time I have made individual mini cheesecake in a shot glass. Desserts in a mug, cup or glass are the best way to ensure you’re only eating one serving.
This recipe has no egg, no gelatin, and no agar-agar.

1529335960685

Recipe courtesy…Spice up the curry

Prep Time 20 minutes Cook Time 20 minutes Yield 6 servings

INGREDIENTS :
For bottom crust/layer :
1 cup Graham cracker crumbs or crushed digestive biscuits.

2 tablespoons White granulated sugar

¼ cup Unsalted butter Melted and cooled
For cheesecake filling :

4 ¼ cups Milk

1-2 tablespoons Lemon juice freshly squeezed

2 medium Mangoes or 1 cup pureed

¼ cup Plain yogurt (dahi or curd) Make sure it is thick, not watery

¾ cup White granulated sugar reduce if using store-bought sweetened mango puree

½ cup Heavy whipping cream or fresh cream or malai
Decoration:

Hapus variety mangoes for mango rose.

INSTRUCTIONS :
Making the bottom layer:

  1. Take graham cracker crumbs, sugar and melted butter in a bowl. Mix well.
    Press crumbs evenly in the bottom of shot glasses.
  2. keep in refrigerator to set for about 15-20 minutes to set.1529334858495Making mango cheesecake filling:
  3. Heat the milk in a heavy bottom pan to make paneer on medium heat.
  4. Let it come to a boil. Turn off the stove.
  5. Gradually add lemon juice and stir. It will start to curdle.
  6. Once all the milk curdles strain it.
  7. separate the paneer and whey using a muslin cloth or man’s handkerchief. Rinse it under the cold water.1529334738095
  8. Squeeze out all the water, Keep it aside in the strainer till needed.1529334942911
  9. Take heavy cream in a bowl. Make sure it is chilled.
  10. Whip it till you get the stiff peak. keep it aside.
  11. make a smooth puree of mangoes and sugar in the blender.
  12. Add paneer and thick yogurt. again blend it till smooth. Remove it to a bowl.
  13. Add whipped cream. fold it in.1529335027990
  14. Now take the shot glasses from the fridge and pour the cheesecake mixture into it.1529335175381
  15. Let it chill for 2,3 hours in the fridge.
  16. Once chilled decorate with mango rose and serve.1529335592115
  17. how to make mango rose link is hereHow To Make Mango Rosette1529335898021
    NOTES:
  • As we are making dessert in shot glass hence need to set it much.
  • Mango rose decoration should be made just before serving.
  • In place of mango rose you can also decorate it with whipped cream and dry fruits.

Thank you for visiting Astha’s Kitchen. I would love to hear your feedback.

Hate to miss a recipe? Like my Facebook to stay updated!

Astha’s Kitchen on Facebook

                                                   Like share and spread your love ❤

MANGO KitKat PUDDING

An easy to make no-bake dessert made with layers of sweetened whipped cream/ paneer, curd, mango puree mix and crushed Kit Kat candy bars.

1528128102460

One of my favorite things is making puddings /shot glass desserts. My family likes desserts very much.We like to celebrate with desserts and even have them after a workout. Actually, we just try to find reasons to have desserts. I am sure there are many others who are like us out there.

I always try to use available ingredients in my desserts. This time I got the idea to mix mango with KitKat.
You may skip mango and can make at any time of the year because it is as easy as a breeze to put this together.

This pudding doesn’t take anything fancy to make it, but it sure does taste totally delicious.  Do try it out. I’m sure you will love it.

1528128166835

INGREDIENTS:

3 Kit Kat bars1528127229541
1cup whipped cream
1/2 cup paneer
1/2 cup mango puree
3 tbsp sweetened condensed milk
1/4 cup milk
1/2 cup chopped mango

INSTRUCTIONS :

  1. Powder the Kit Kat bars and keep aside.1528127445405
  2. In a blender add paneer, milkmaid mango puree and hung curd blend for 2 minutes till the mix turns a little thick.
  3. Add this mixture to whipped cream and mix gently .your mango pudding mix is ready.1528127324714
  4. Fill this mixture into a piping bag.
  5. In a small glass put the crushed Kit Kat and layer the pudding mix alternatively.
  6. In center add some chopped mango, The last layer should be Kit Kat.1528127502014
  7. Refrigerate for 3-4 hours and serve.
  8. decorate with wafer rolls and Cadbury shots

1528128271532


NOTES:

  • This can be made in a big pudding tray too.
  • If you want the dessert to be sweeter add more sweetened condensed milk.
  • Thank you for visiting Astha’s Kitchen. I would love to hear your feedback. 

    Hate to miss a recipe? Like my Facebook to stay updated!
    Like share and spread your love 


SHOT GLASS APPLE PAIRFAIT

Enjoy this delicious parfait layered with yogurt, apples, and corn flex topping that is ready in 10 minutes – perfect for a dessert /breakfast A sweet apple cinnamon filling alternated with yogurt and corn-flex its the ultimate Apple Parfait.

PicsArt_09-10-07.44.02

This parfait I made the first time for my shot glass dessert workshop.Everyone like it and it’s a big hit in my workshop.

Best combination of apple and yogurt.
Enjoy .


INGREDIENTS :
4 medium apples, cored and chopped into 1-inch cubes
1/2 cup brown sugar
1 teaspoon cinnamon
1/2 teaspoon ground nutmeg
1 teaspoon vanilla essence –
1 tablespoon lemon juice
3 cups hung curd and 2 tbsp sugar
favorite cereal(honey loop/corn flex /muesli)
or any cookie crumble


INSTRUCTIONS:

  1. Take chopped apples and put in large bowl.
  2. Add brown sugar, cinnamon, nutmeg, lemon juice and vanilla paste, stir and let sit for 30 minutes.
  3. The apples will be sitting in a bowl of sugary liquid.
  4. Take apples and juice and put into a saucepan on the stove. Simmer for about 10 to 15 minutes or until the apples are soft but not falling apart.PicsArt_09-09-09.11.09
  5. The sugar mixture should thicken up a bit. Remove from heat and let cool.
  6. Layer the yogurt sugar mixture(sugar is optional) and cooled apple mixture into 12 shot glasses (less or more depending on the size of your glasses).PicsArt_09-09-10.58.09
  7. Continue until you reach the top of each glass, then sprinkle with the crushed cereal.
  8. PicsArt_09-10-07.45.09


NOTES :

A number of ingredients you need will vary with the size of your shot glasses. I used 4 medium size apples and 3 cups  Hung curd to make 12 desserts. And don’t worry, if you eat two it’s okay because they are mini!PicsArt_09-10-07.43.02


  • Thank you for visiting Astha’s Kitchen. I would love to hear your feedback. 

    Hate to miss a recipe? Like my Facebook to stay updated!
    Like share and spread your love ❤️