
Birthdays are a time for celebrating…you, your family members, and your friends!
You can make the cake and do it yourself…yes, you can and it doesn’t have to be perfect.because you’re celebrating someone and their birthday, that’s the most important part to remember.A perfectionist at heart, it’s hard to let go of perfection.
I have always wanted to make a rainbow cake. Since I have seen this one, I have always wanted to do it…like seriously on my baking bucket list.And my husband’s birthday is the most awaited and special day ..so I decided to try this …
I like to use my homemade Eggless malai vanilla cake for this recipe. Most recipes I’ve seen online for rainbow cakes use a couple of box cake mixes to make the process easier. I’m not knocking the box cakes at all honey if that’s your thing, do what you gotta do! It’s hard out here!
Let me tell you right now – this cake is DELICIOUS! The concentrated gel colors have no effect on the flavor – a yummy vanilla cake sandwiched together with gorgeous whipped cream and ganache frosting! Soooo good!
It was so much fun and hopefully, with my straightforward photos and steps, you can do it too! It will be perfect for your next birthday celebration. You can do it…if I can…you can too!
I am happy and excited.I nailed it beautifully.My hubby darling loved it.
INGREDIENTS :
For the cake
Ingredients
Malai 1 cup +1/2 cup
Sugar 1 cup +1/2cup
Refined flour (maida) 2cups+ 1cup
Milk powder 1 cup+ 1/2 cup
Baking soda 1tsp
Baking powder 2tsp
Salt to taste
Milk 1 cup+1/2cup
Vanilla essence 3/4 Tsp
lemon juice 1 tsp +1/2tsp
curd 2tsp
Gel colors (purple, blue, green, red, orange, yellow)
For the frosting
Whipped cream 3cups
For Ganache
200 ml Amul cream
200 gms white chocolate
Chocolate colours
1tbsp butter
STEP 1- PREP CAKE BATTER
- Preheat the oven at 180°C.
- Combine the Malai and sugar lemon juice and curd in a bowl and whisk well.
- Keep aside.
- Combine the plain flour, baking powder and baking soda and sieve 2-3 times and keep aside.
- Add the milk and milk powder and maida mixture to the malai gradually and keep stirring.
- Gradually and alternatively finish the mixture and keep stirring.

- The mixture should be of the pouring consistency.
- Now add the vanilla essence and lightly stir again once and used a ladle to separate it as evenly as possible into six bowls. (There will be six layers to the cake, hence the six bowls.)
STEP 2- GET YOUR COLOR ON!
I used my gel colors to dye each bowl to my desired color.
Add food coloring to each bowl to create a vibrant red, orange, yellow, green, blue, and violet.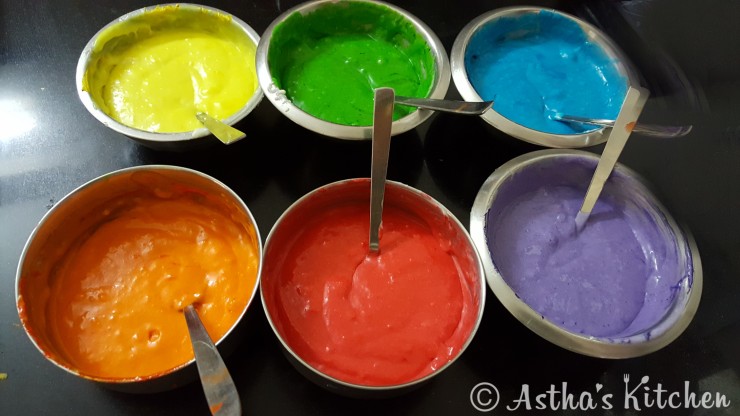
STEP 3- BAKE IT UP!
- I greased two 6″ heart-shaped baking pans.Pour each colored batter into the prepared pans and spread out into an even layer. (layers will be thin)
- Bake for 25-30 minutes or until center is set.
- Repeat the same process with rest of the batter and bake all 6 layers.Allow the cake pans to cool a little bit and then wash them. Bake and cool remaining 3 cake layers.

- Remove from oven and let cakes cool in the pan until pans are warm enough to touch.
- Run a spatula around the edges of the pans to loosen the cake and then very carefully remove the cakes from the pans.
- Place on a cooling rack and cool completely.

STEP 4- FROSTING WITH WHIPPED CREAM
- Put a little of the cream cheese frosting on the plate or cake stand you’ll be using to adhere the first layer of cake. Pop it onto the center of the plate, and then frost and put on the next layer.

- Place the violet layer down first and frost.
- Followed by the blue layer, green layer, yellow layer, orange layer and finally the red layer. (Frost between each layer).

- Place a thin coat of the icing on the cake to create a crumb coat. This will make the cake even all around and seal any loose crumbs.

- Once the crumb coat is set, finish frosting the cake.

At this point, I was feeling so accomplished. Ignore the mess behind the cake…this is what happens when you’re making a birthday cake…and it’s okay!
Almost done!
So exciting!
Refrigerated the cake for at least 2 hours or overnight before cutting.
STEP 5 GANACHE MAKING AND CAKE DECORATION
- Place chocolate in a medium heatproof bowl; set aside.
- Place cream in a small saucepan over medium heat and bring to a simmer.
- Pour over chocolate and let stand until chocolate has softened about 5 minutes.
- Add butter and stir until smooth. Let cool slightly before using.
- Divide ganache between 6 bowls. Color each bowl of ganache using candy coloring creating a purple, blue, green, red, yellow and orange.
- Start at one end of the cake and pour a spoonful of purple ganache over the top edge allowing it to drip down the sides of the cake.
- Next, to the purple add a spoonful of blue, then green, yellow, orange, red, If desired, swirl the colors on the top of the cake.
- If the ganache becomes too thick, heat it in the microwave for about 10 seconds to thin it out.
Finish cake border with whipped cream frosting and silver lace.
Done! I felt so accomplished and excited!
And I held my breath when I cut into it…
And literally squealed with excitement! I couldn’t believe I did it…I was so excited and seriously, the gorgeous colors, it made me smile the entire day!
Now I’m more excited to try different color combinations.
NOTES:
you may adjust the size of cake layers.
you may make more or fewer layers.
Thank you for visiting Astha’s Kitchen. I would love to hear your feedback.

This is stunning!
LikeLike
thanks
LikeLike